Difference between revisions of "2012 Nissan Frontier: Yaesu FT-7900R Install"
(→The NMO Mount) |
|||
| (3 intermediate revisions by the same user not shown) | |||
| Line 43: | Line 43: | ||
**Misc. | **Misc. | ||
***Factory Installed [http://www.nissanusa.com/innovations/utili-track.article.html Utili-Track™] or a [[2012_Nissan_Frontier:_Strut_Channel_Install|DIY Utili-Track]] solution. | ***Factory Installed [http://www.nissanusa.com/innovations/utili-track.article.html Utili-Track™] or a [[2012_Nissan_Frontier:_Strut_Channel_Install|DIY Utili-Track]] solution. | ||
| − | ***[http://www.plastidip.com/home_solutions/Liquid_Tape Liquid Electrical Tape] | + | ***<s>[http://www.plastidip.com/home_solutions/Liquid_Tape Liquid Electrical Tape]</s> [https://www.amazon.com/Loctite-Flashing-10-Fluid-Cartridge-1618181/dp/B004BPETG6 Black Roofing Sealant] |
| + | ***[https://www.amazon.com/Rust-Oleum-Automotive-253351-32-Ounce-Mineral/dp/B0070S82AU Mineral Spirits] | ||
***[https://en.wikipedia.org/wiki/Cable_tie Zip Ties] | ***[https://en.wikipedia.org/wiki/Cable_tie Zip Ties] | ||
***A piece of scrap metal at least 1.6" x 1.6" inches square (see [[#The NMO Mount|The NMO Mount]]) | ***A piece of scrap metal at least 1.6" x 1.6" inches square (see [[#The NMO Mount|The NMO Mount]]) | ||
| Line 164: | Line 165: | ||
#Insert the Antenna Cable NMO Connector through the bottom of the NMO mount and screw the top piece on. Make sure the cable is at the angle you want it. I chose to have it stick out toward the side of the truck.<br />[[File:Yaesu_Install_NMO_Mount_4.jpg|400px]] | #Insert the Antenna Cable NMO Connector through the bottom of the NMO mount and screw the top piece on. Make sure the cable is at the angle you want it. I chose to have it stick out toward the side of the truck.<br />[[File:Yaesu_Install_NMO_Mount_4.jpg|400px]] | ||
#Once you've got it setup the way you want, it's time to weather proof. Remove the NMO Right Angle Bracket from the Strut Channel (but keep the Antenna Cable attached). Mount the entire thing in the vice setup you used for soldering.<br />[[File:Yaesu_Install_NMO_Mount_5.jpg|400px]] | #Once you've got it setup the way you want, it's time to weather proof. Remove the NMO Right Angle Bracket from the Strut Channel (but keep the Antenna Cable attached). Mount the entire thing in the vice setup you used for soldering.<br />[[File:Yaesu_Install_NMO_Mount_5.jpg|400px]] | ||
| − | #Take your Liquid Electrical Tape and apply a nice fat blob to the connector and let it dry.<br />[[File:Yaesu_Install_NMO_Mount_6.jpg|400px]] | + | #<span style="color: red>NOTE: After about 5 years the Liquid Electrical Tape used in the next couple steps really started to become brittle and crack. I think it couldn't stand up to the UV exposure. I replaced it with a Polyurethane based roofing sealant. It should work better as it is designed to be under constant exposure to the sun and weather.</span> |
| − | #Check the area below the cable for a gap. If there is a gap there, pull the cable back and put some more Liquid Electrical Tape there and let it dry.<br />[[File:Yaesu_Install_NMO_Mount_7.jpg|400px]] | + | #Take your <s>Liquid Electrical Tape</s> Roofing Sealant and apply a nice fat blob to the connector and let it dry.<br />[[File:Yaesu_Install_NMO_Mount_6.jpg|400px]] |
| + | #Check the area below the cable for a gap. If there is a gap there, pull the cable back and put some more <s>Liquid Electrical Tape</s> Roofing Sealant there and let it dry.<br />[[File:Yaesu_Install_NMO_Mount_7.jpg|400px]] | ||
#Put 1 last coat over the whole thing and work up the cable an inch or so (this is to provide some additional strain relief). Let it dry.<br />[[File:Yaesu_Install_NMO_Mount_8.jpg|400px]] | #Put 1 last coat over the whole thing and work up the cable an inch or so (this is to provide some additional strain relief). Let it dry.<br />[[File:Yaesu_Install_NMO_Mount_8.jpg|400px]] | ||
#Now it's time to reattach the bracket to the Strut Channel. I also decided to Zip Tie the cable to the nearest spacer bolt as additional strain relief. If you chose to buy an NMO Weather Cap, install it until you're ready to put your NMO Antenna on. The silver you see on the center pin of my NMO Connector is a bit of solder I used when trying to heat up the center pin. It's flat and shouldn't cause any problems.<br />[[File:Yaesu_Install_NMO_Mount_9.jpg|400px]][[File:Yaesu_Install_NMO_Mount_10.jpg|400px]] | #Now it's time to reattach the bracket to the Strut Channel. I also decided to Zip Tie the cable to the nearest spacer bolt as additional strain relief. If you chose to buy an NMO Weather Cap, install it until you're ready to put your NMO Antenna on. The silver you see on the center pin of my NMO Connector is a bit of solder I used when trying to heat up the center pin. It's flat and shouldn't cause any problems.<br />[[File:Yaesu_Install_NMO_Mount_9.jpg|400px]][[File:Yaesu_Install_NMO_Mount_10.jpg|400px]] | ||
#Congrats! You're done with the NMO Mount!<br />[[File:Yaesu_Install_NMO_Mount_12.jpg]] | #Congrats! You're done with the NMO Mount!<br />[[File:Yaesu_Install_NMO_Mount_12.jpg]] | ||
| − | |||
===Radio Power & Interface Cable=== | ===Radio Power & Interface Cable=== | ||
| Line 207: | Line 208: | ||
#The switches in the Center Stack come out the same way. Remove the Center Stack. Go in from behind and using a small screwdriver, lift the plastic tabs holding the switches in place. Go ahead and remove the blank switch placeholders from both sides as well.<br />[[File:Yaesu_Install_Switches_6.jpg|400px]][[File:Yaesu_Install_Switches_7.jpg|400px]][[File:Yaesu_Install_Switches_8.jpg|400px]] | #The switches in the Center Stack come out the same way. Remove the Center Stack. Go in from behind and using a small screwdriver, lift the plastic tabs holding the switches in place. Go ahead and remove the blank switch placeholders from both sides as well.<br />[[File:Yaesu_Install_Switches_6.jpg|400px]][[File:Yaesu_Install_Switches_7.jpg|400px]][[File:Yaesu_Install_Switches_8.jpg|400px]] | ||
#Now comes the scariest thing you've ever done to your vehicle... it's time to cut some wires! First make sure you have all of the necessary equipment. I recommend several different colors of wire, wire strippers, wire crimpers, and flush cutters. I'm going to show the procedure on the Cargo Lamp switch. You'll need to do the same thing with the other switches.<br />[[File:Yaesu_Install_Switches_9.jpg|400px]] | #Now comes the scariest thing you've ever done to your vehicle... it's time to cut some wires! First make sure you have all of the necessary equipment. I recommend several different colors of wire, wire strippers, wire crimpers, and flush cutters. I'm going to show the procedure on the Cargo Lamp switch. You'll need to do the same thing with the other switches.<br />[[File:Yaesu_Install_Switches_9.jpg|400px]] | ||
| − | #You don't have a ton of extra cable | + | #You don't have a ton of extra cable so be judicious with yours cuts. Unplug your switches and remove the heatshrink around the cable. The make that oh so scarey cut! Make sure you cut about in the middle of the exposed wires. You'll need to reattach the plug later (unless you opt for an aftermarket switch as I did on the Cargo Lamp switch).<br />[[File:Yaesu_Install_Switches_10.jpg|400px]][[File:Yaesu_Install_Switches_11.jpg|400px]][[File:Yaesu_Install_Switches_12.jpg|400px]] |
#Now it's time to add some extended length cabling so we can reposition the switch on the other side of the steering wheel. Ideally you'd use the exact same color wire but I didn't have that so I did the best I could. I chose crimp style butt connectors to attach my extensions. It's easier than trying to get a soldering iron in the car. But beware! You must make sure your crimp job is good. Give a tug on every wire you crimp. The 1st time around I had a couple loose connections that cause failures. Once I fixed everything, it worked fine. I've driven about 1000 miles with this new setup (at the time of this writing) with no reliability problems. Once you're confident your crimp job is good, zip tie everything together (1 an inch before, 1 on and 1 an inch after the crimp) to make everything a bit more solid.<br />[[File:Yaesu_Install_Switches_13.jpg|400px]][[File:Yaesu_Install_Switches_14.jpg|400px]] | #Now it's time to add some extended length cabling so we can reposition the switch on the other side of the steering wheel. Ideally you'd use the exact same color wire but I didn't have that so I did the best I could. I chose crimp style butt connectors to attach my extensions. It's easier than trying to get a soldering iron in the car. But beware! You must make sure your crimp job is good. Give a tug on every wire you crimp. The 1st time around I had a couple loose connections that cause failures. Once I fixed everything, it worked fine. I've driven about 1000 miles with this new setup (at the time of this writing) with no reliability problems. Once you're confident your crimp job is good, zip tie everything together (1 an inch before, 1 on and 1 an inch after the crimp) to make everything a bit more solid.<br />[[File:Yaesu_Install_Switches_13.jpg|400px]][[File:Yaesu_Install_Switches_14.jpg|400px]] | ||
#Leave plenty of extra length on your extension lines and cut them to length later. Run them along the bottom of the dash by the steering wheel and out through the opening in the Center Stack. If you are going to use the same factory switch, then re-attach the plug using the same strip, crimp, & zip-tie procedure you used before. Keep your colors straight. If you're going to use an aftermarket switch, keep reading.<br />[[File:Yaesu_Install_Switches_15.jpg|400px]][[File:Yaesu_Install_Switches_16.jpg|400px]] | #Leave plenty of extra length on your extension lines and cut them to length later. Run them along the bottom of the dash by the steering wheel and out through the opening in the Center Stack. If you are going to use the same factory switch, then re-attach the plug using the same strip, crimp, & zip-tie procedure you used before. Keep your colors straight. If you're going to use an aftermarket switch, keep reading.<br />[[File:Yaesu_Install_Switches_15.jpg|400px]][[File:Yaesu_Install_Switches_16.jpg|400px]] | ||
| Line 277: | Line 278: | ||
#It's been a long journey but your Yaesu FT-7900R is finally installed and looking great!<br />[[File:Yaesu_Install_Mic_7.jpg]] | #It's been a long journey but your Yaesu FT-7900R is finally installed and looking great!<br />[[File:Yaesu_Install_Mic_7.jpg]] | ||
| − | [[Category: | + | [[Category:Nissan Frontier]] [[Category:Ham Radio]] |
Latest revision as of 19:53, 23 July 2019

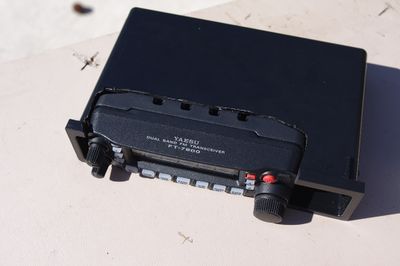
This page details the installation of my Yaesu FT-7900R Dual Band (2m/70cm, 144MHz/430MHz), Mobile, Ham Radio in my 2012 (Gen2) Nissan Frontier Crew Cab. I wanted a clean, professional, looking install but I didn't want to make any permanent modifications to my vehicle. In doing this project I took advantage of my recent DIY Utili-Track.
Contents
Assumptions
- You want a really clean looking install and are willing to put in a bit of extra work
- You want to make, minimal, permanent modifications to the vehicle
- You can solder, operate a drill, operate a Dremel Tool, etc
Grocery List
- I'm sure I'm missing stuff from this list but it's a damn good start!
- Radio
- HAM Gear
- Yeasu FT-7900R Dual Band Mobile Transceiver
- Yaesu YSK-7800 Separation Kit
- Comet SSB-5NMO Dual Band NMO Antenna
- A right angle Trunk Mount NMO Bracket
- A 17' NMO to PL-259 RG58 Cable (Don't go too much shorter than 17'. 15' would be the absolute minimum)
- (optional) NMO Weather Cap
- Hardware
- ~8"x12"x1/4" Sheet of Lexan (or similar)
- Hook side velcro tape
- 4x 10-32x3/4" Flat Head Machine Screws
- 4x 10-32 Nuts
- 4x #10 Lock Washers
- 4x #10 Flat Washers
- Zip Ties
- Tools
- Drill (preferably a Drill Press)
- Counter Sink Bit
- #7 Drill Bit
- HAM Gear
- Antenna
- Hardware
- 2x 10-24 Spring Nuts
- 2x 10-24x1" Pan Head Screws
- 2x #10 flat washers
- 2x #10 split (lock) washers
- Tools
- A Drill & a 13/62" Drill Bit
- Wrench/Socket Set
- 130W+ Soldering Iron (possibly optional, see Basic Information)
- Misc.
- Factory Installed Utili-Track™ or a DIY Utili-Track solution.
Liquid Electrical TapeBlack Roofing Sealant- Mineral Spirits
- Zip Ties
- A piece of scrap metal at least 1.6" x 1.6" inches square (see The NMO Mount)
- 1/8" Hex Key
- Solder
- (optional) Solder Braid
- (optional) Solder Flux
- Hardware
- Power
- Hardware
- Aftermarket Switches from OTRATTW
- 2x V1D1GNNB Switch Bodies (SPST switch with a common GND for LEDs, Amber/Amber LEDs and indicator light VCC hooked to switch path) for Custom Accessories
- 1x VAD2UNNB Switch Body (fully independent 2 light, DPDT, switch with Amber/Amber LEDs) to replace factory Cargo Light Switch
- 1x VVPZC59-1TL Rocker for replacement switch for the Cargo Lights
- 1x Custom Rocker with the CB Radio Icon, a Light Bar at the Bottom, and the text "COMMS" in the middle
- 1x Custom Rocker of your choosing for your next accessory!
- Blue Seas 6 Circuit ST Blade Fuse Block without Negative Bus (PN 5028)
- Barrier Strip
- 1x 3 Position Terminal Block/Barrier Strip. Something like the Cinch 3-142
- 2x 2 Position Terminal Block Jumpers. Something like the Cinch 142J-2 (a single 3 positioner jumper will also work and came with my eBay Barrier Strip.)
- Please note Wire color are just what I used, some Gauges are not ideal, but are what I had access to. Approx required length should leave you with some spare as well
- I've been buying all my wire from the My Car Audio and More eBay Store and have really liked the price, product, and speed.
- ~5' Red 10AWG Wire
- ~25' Red 12AWG Wire
- ~25' Black 12AWG Wire
- ~5' Blue 12AWG Wire
- ~25' Yellow 16AWG Wire
- ~5' White 16AWG Wire
- ~5' Black 16AWG Wire
- ~100' White 18AWG Wire
- ~25' Black 18AWG Wire
- ~10' Yellow 18AWG Wire
- ~10' Orange 18AWG Wire
- ~10' Red 18AWG Wire
- Plenty of Spade Terminals, Ring Terminals, Butt Connectors, and 1/4" Female Quick Disconnect Terminals (insulated and bare). I recommend you buy a kit.
- Various diameters of Heat Shrink. I recommend you buy a kit.
- 6.5"x8"x1/4" Sheet of Lexan (or similar)
- 5x 10-32x1" Flat Head Machine Screws
- 5x 10-32 Nuts
- 5x #10 Lock Washers
- 5x #10 Flat Washers
- 1x 8-32x1.5" Pan Head Machine Screw
- 6x 8-32x3/4" Flat Head Machine Screws
- 7x 8-32 Nuts
- 4x #8 Lock Washers
- 1x #8 Flat Washer
- 2x 6-40x3/4" Flat Head Machine Screws
- 2x 6-40 Nuts
- 2x #6 Lock Washers
- 5x #6 Flat Washers
- Zip Ties
- Adhesive Zip Tie Mounts
- The following parts from Digikey (includes a few spares)
- 3x WM2245-ND
- 3x WM2240-ND
- 10x WM6459CT-ND
- 5x WM1947-ND
- 15x WM6460CT-ND
- 10x WM6457CT-ND
- 1x WM57210-ND
- 1x WM4424-ND
- 5x Bosche Style Relays
- 5x Bosche Style Relay Harnesses with Pig Tails
- Aftermarket Switches from OTRATTW
- Tools
- Heat Gun
- Flush Cutters
- Soldering Iron
- Crimp Tool
- Dremel Tool
- Circular Saw, Jig Saw, Table Saw, etc.
- Wire Strippers
- Long, Skinny, Needle Nose Pliers
- Something very sharp & pointy like a Scribe.
- Hardware
Lessons Learned
- I'll mention it again later in the article, but I DON'T recommend you remove and reattach the NMO connector. It's just too hard to solder because it is such a giant heatsink. Instead coil any extra cable you have behind the rear seat. The loss is pretty minor at these frequencies. Alternatively you can remove the connector on the otherside and buy a new crimp style connector to replace it. This is probably the right answer.
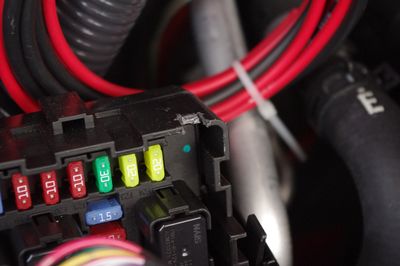
- When installing the Relay/Power Distribution Plate you don't want screws at the far back side of the flat area on the Lid for the Nissan Fuse box. They will interfere with stuff inside the box (you'll see later on in the article)
- If I had to do it all over again, I'd probably mount the Radio underneath the Driver's seat instead of underneath the Passenger's seat. This would make the antenna & power cable runs shorter. This would also put the speaker right below me. Currently it is to my right so my right ear picks up the sound more then my left which makes my head feel funny hehe. I'll probably move the radio some time. It won't be too much work.
- When moving the factory switches, located to the right & left of the driver's seat, only the Signal lines need be extended. I extended all 4 lines for each of the 3 switches (a total of 12). In each set of 4, there is 2 GND, 1 Signal, & 1 Dash Light 12V. I could have extended the 3 Signal lines and just reused existing GND, & Dash Light 12V.
- Aftermarket stereos buzz! Actually, the replacement dash console is cheap and the mount that holds a stereo in place is kinda stupid. I had a lot of vibration after putting all this stuff together and it took me a while to figure out exactly what the problem was. The final solution which fixed everything 100% was to jam cardboard (you could use a dense foam or other material) between the top of the stereo and the plastic of the center dash console and to jam cardboard between the bottom of the stereo and that top of the black plastic pocket that came with the replacement console.
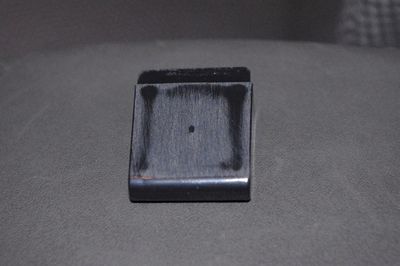
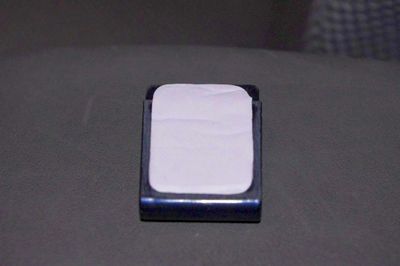
- The adhesive Mic Holder doesn't really work. The adhesive is crappy. I replaced it with a metal one that is held on by two screws. I didn't take pictures but plan on adding a second some day to accommodate a CB radio. When I do I'll take pictures of that and update the article.
Directions
Click on any photograph for a larger view.
The Antenna Cable
I decided to mount my Radio underneath the Front Passenger Seat. I plan on installing an Inverter in the future and want to put that under the Driver Seat to minimize the cable run (the primary entry point from the engine compartment is on the driver's side of the firewall) since the source cables for the Inverter will, likely, be the biggest cables I run in of my installs.
- EDIT: As stated above in the Lessons Learned I probably should have put the radio body under the driver's seat. Additionally, I've decided that any inverter I install that is over a few hundred watts will need to live in the engine compartment, close to the battery. The high amp DC cable runs just can't that long.
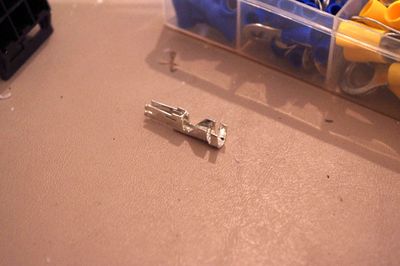
- Cut the NMO connector off of the RG-58 Cable. I don't have a photo of the freshly cut NMO Connector but the photo below shows it cut and desoldered.

- Locate the entry point for the cabling underneath the Front Passenger Seat.

- Pop up the Kick Plate (pulling up part of the Weather Seal will make this easier) and feed the cut end of the cable through. At the end of the day you want the PL-259 Connector underneath the seat.

- Feed the cable end back toward the rear of the vehicle.

- Remove the kick plate from the back.

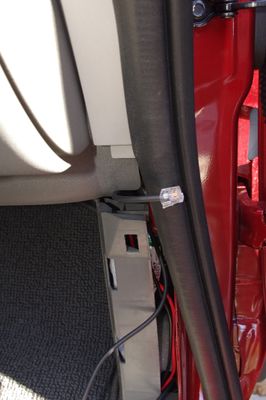
- Pull up a bit of the Weather Seal from both the front & back (if you haven't already) and feed the cable end underneath the Center Pillar.


- Remove the bolt that holds the Rear Passenger Seat Belt in place at the bottom.

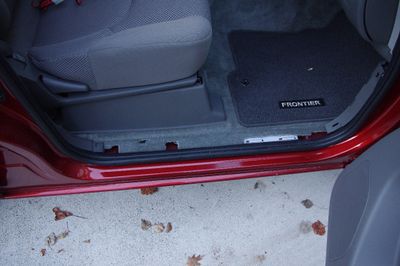
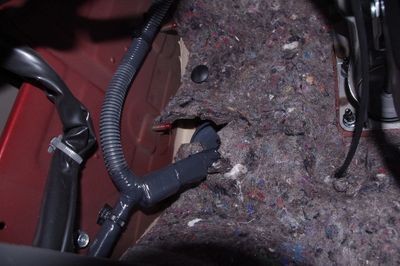
- Pop out the Plastic Trim Panel behind the Rear Passenger Door. Beware of the little orange buttons. They like to stay in the frame (see 2nd photo below). If this happens, pull it out with a pair of needle nose pliers and put it back in the Plastic Trim piece before reassembling everything.


- Feed the cable end behind the Trim Piece and around the corner.

- Pop out the 3 black buttons that hold the carpet section the wall at the back of the cab (below the rear window).

- Go back around to the Rear Driver's Side Seat and pull out the carpet to expose the Draft Vent.


- Now run your cable along the back edge of the cab to the vent. Then tuck the cabling behind the carpet.


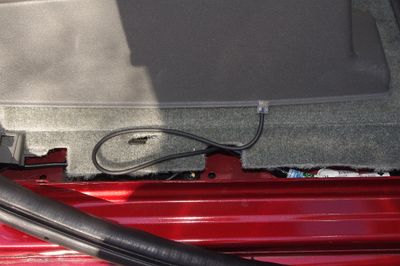
- Feed the cable out through the upper right hand corner of the Draft Vent. Go back and do a final check on the cable length (ie: the pigtail sticking out of the floor underneath the Passenger Seat) and then Zip Tie the cable to the Draft Vent.


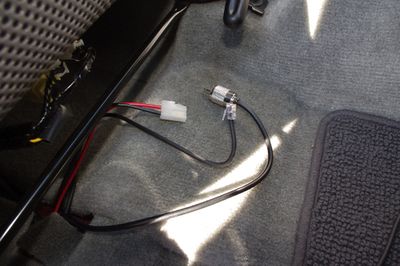
- Now it's time to reattach the NMO connector to the cable. I'll warn you again, do NOT try to do this with a wimpy $20 iron. I ended up trying with one of these (actually 2... at the same time) and failed. I solved the problem by borrowing a friend's 130W Weller Solder Station. This got the job done... but it still wasn't pretty.

- You'll first need to test fit your cable so run it to your NMO mount the way you like (snaking behind the Strut Channel, etc) and figure out the right length. Leave yourself a couple of spare inches just in case.
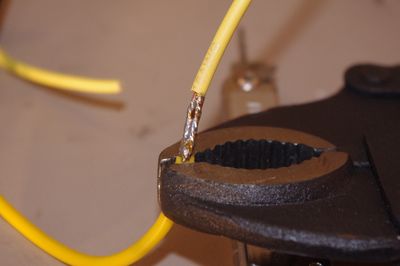
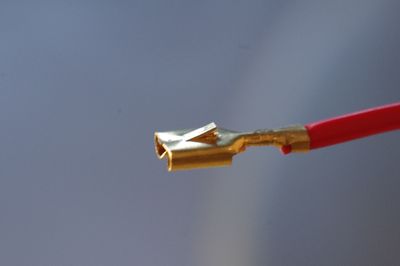
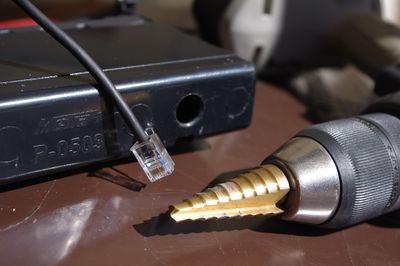
- Trim the cable to length and then prepare the end as shown in the photo below. The NMO Connector is shown as well.

- Now, the setup here can be kind of tricky but you'll need to get a portable bench vise (or some other way to securely hold the connector while you solder) and put it on a box or something to bring it up to the appropriate height. Don't be rushed on this. You'll need a nice, stable, surface to work on. First solder the center pin. You're going to have to heat up the solder and then jam the pin in. Do the jacket next. The completed product is shown in the photo below. Please DO NOTE the fairly crappy looking solder job. I'm a pretty competent solderer but this was very difficult. There is just so much heat sink material plus since this was a "reused" connector I had to deal with solder in the pin hole to begin with. Anyhow, what is important is that you have a good electrical connection. The rest will be covered up with Liquid Electrical Tape soon.

- Reassemble the Interior of your truck and you're done running the Antenna Cable!


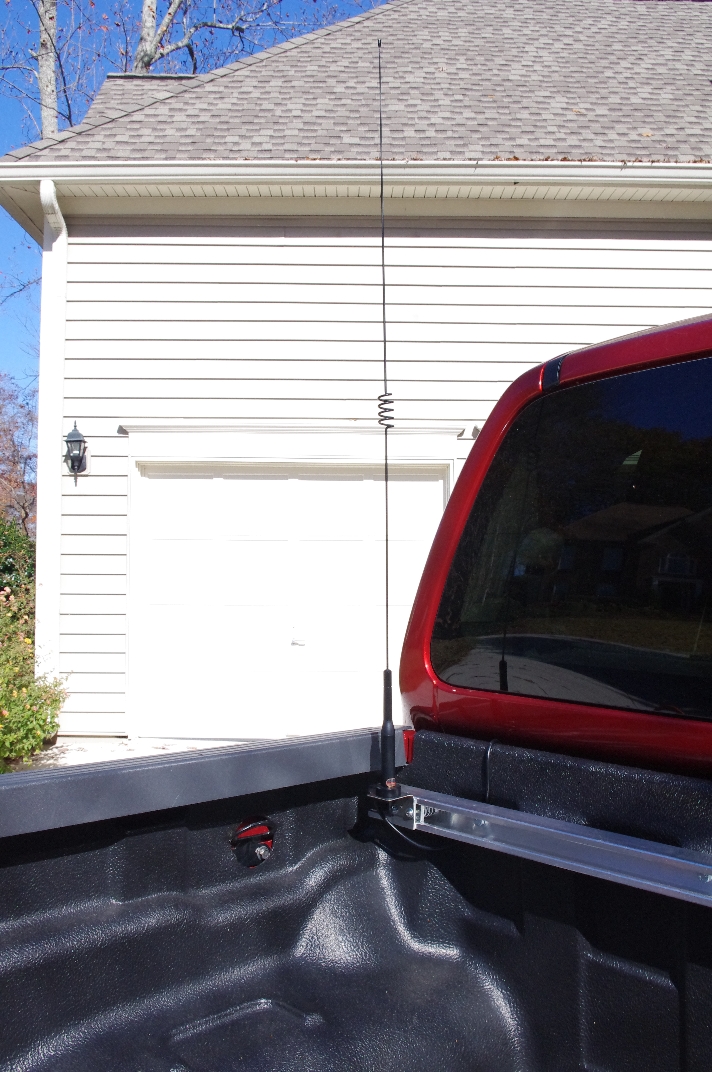
The NMO Mount
I chose to use an NMO type antenna because I think they are the most professional looking install. Additionally I decided to mount the antenna on my recently installed Strut Channel. This had a couple advantages: 1.) I didn't have to drill any holes in the vehicle. 2.) I could use my cool new Strut Channel :) 3.) It placed my antenna such that it is almost exactly the same height as the factory AM/FM Radio Antenna.
- Drill out the 2 bottom holes on the NMO Right Angle Bracket using the 13/64" Drill Bit. This will give clearance for the 10-24 screws.
- Make a washer plate. The washer plate (or something like it) is required to properly mount the NMO Right Angle Bracket. Without the washer plate, the bracket won't work.

- Cut out a 1.6" x 1.6" square from a piece of scrap metal (I used a Guillotine Sheet Metal Shear for this).
- Draw a line across the center of the square.
- Use the NMO Right Angle Bracket as guide to mark where to drill 2 holes in the square (along your center line).
- Drill out the 2 holes you marked off using your 13/64" Drill Bit.
- At the end of all this, you should have the following parts: 2 #10-24 screws, 2 #10 flat washers, 2 #10 lock washers, 2 10-24 spring nuts, washer plate, NMO Right Angle Bracket, & 1/8" Hex Key

- Take everything to the back of the truck and install the NMO bracket into the Strut Channel on the Driver's side.


- Take everything to the back of the truck and install the NMO bracket into the Strut Channel on the Driver's side.
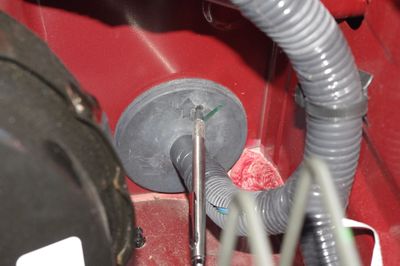
- Insert the Antenna Cable NMO Connector through the bottom of the NMO mount and screw the top piece on. Make sure the cable is at the angle you want it. I chose to have it stick out toward the side of the truck.

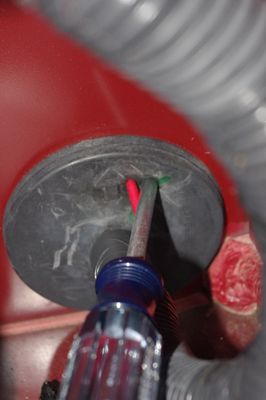
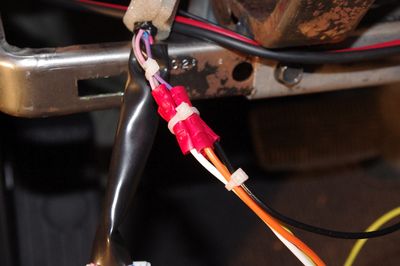
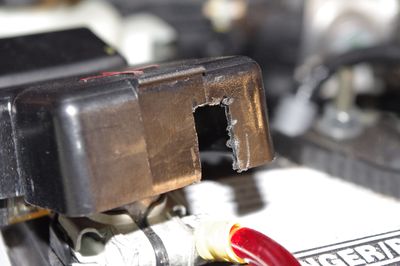
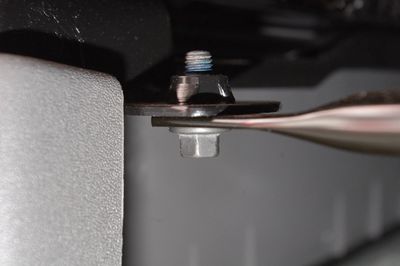
- Once you've got it setup the way you want, it's time to weather proof. Remove the NMO Right Angle Bracket from the Strut Channel (but keep the Antenna Cable attached). Mount the entire thing in the vice setup you used for soldering.

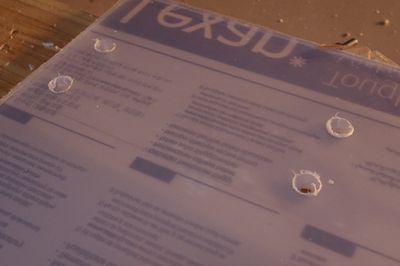
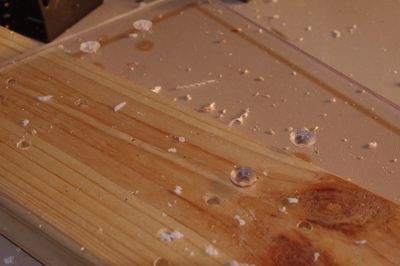
- NOTE: After about 5 years the Liquid Electrical Tape used in the next couple steps really started to become brittle and crack. I think it couldn't stand up to the UV exposure. I replaced it with a Polyurethane based roofing sealant. It should work better as it is designed to be under constant exposure to the sun and weather.
- Take your
Liquid Electrical TapeRoofing Sealant and apply a nice fat blob to the connector and let it dry.
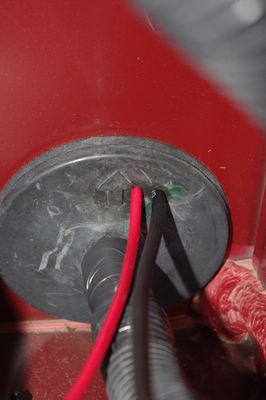
- Check the area below the cable for a gap. If there is a gap there, pull the cable back and put some more
Liquid Electrical TapeRoofing Sealant there and let it dry.
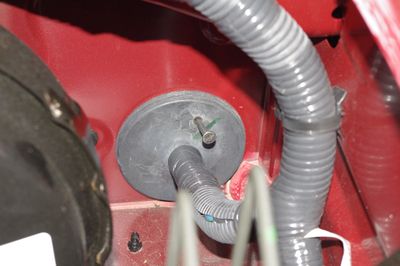
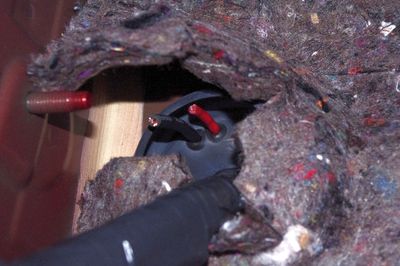
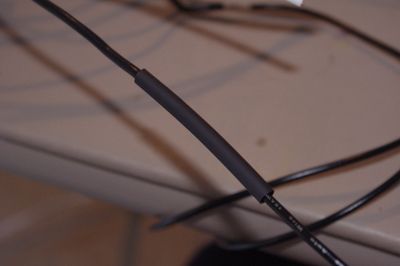
- Put 1 last coat over the whole thing and work up the cable an inch or so (this is to provide some additional strain relief). Let it dry.

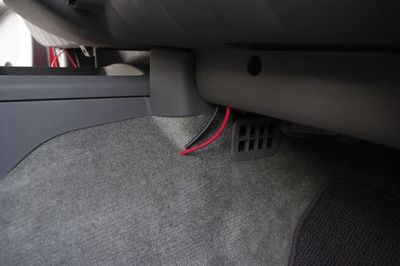
- Now it's time to reattach the bracket to the Strut Channel. I also decided to Zip Tie the cable to the nearest spacer bolt as additional strain relief. If you chose to buy an NMO Weather Cap, install it until you're ready to put your NMO Antenna on. The silver you see on the center pin of my NMO Connector is a bit of solder I used when trying to heat up the center pin. It's flat and shouldn't cause any problems.


- Congrats! You're done with the NMO Mount!


Radio Power & Interface Cable
Whilst these are 2 separate functional items, they run together for a while and so it would be wise to run these cables simultaneously. I ran them separately as I wasn't, originally, sure where I was going to put the Face Plate but I'm going to pretend, for the sake of this article, that I had a little more foresight & ran them at the same time. For this section you'll need the power cable & RJ11 Interface Cable supplied with your Radio.
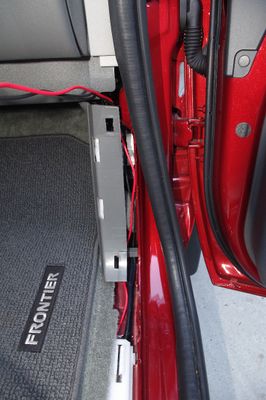
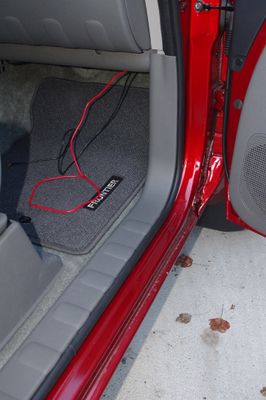
- First remove the kickplate beside the front Passenger Seat.
- Then thread the power & Interface cables from underneath the Passenger Seat to under the Kickplate. The Interface cable is the same on both sides but make sure you leave the white plug underneath the Passenger seat as this is what plugs into your Radio. Pull the excess through and make sure you have enough slack underneath the seat to allow you to plug into the Raido.
- Now run both cables toward the front of the car and through the white plastic structure.

- Now run both cables up under the vertical grey plastic so that it comes out under the glove box.
- Send the cables out the back so they are hidden and put the kickplate back on.


Here is where the paths diverge.
Radio Interface Cable
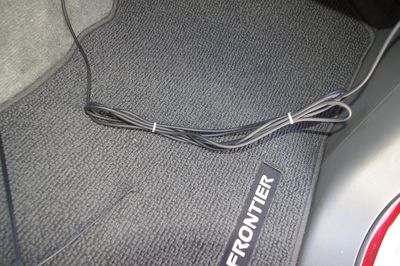
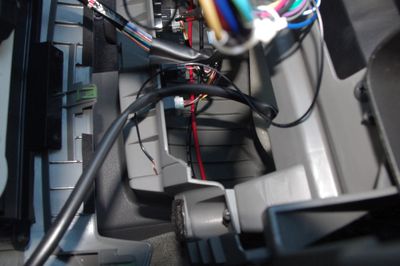
- Threaded the Interface Cable into the back of the Center Stack and pull out about 3 to 4 feet of spare cable (this is so that it will be simple to take the Center Stack apart once everything is done).
- Gather up & zip-tie the excess into a nice bundle and then zip-tie it out of the way behind the glove box area.


Radio Power Cable
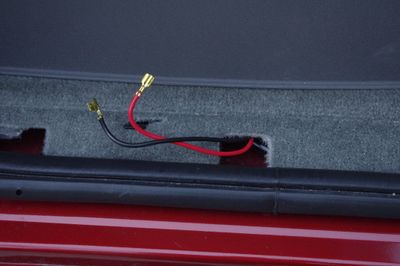
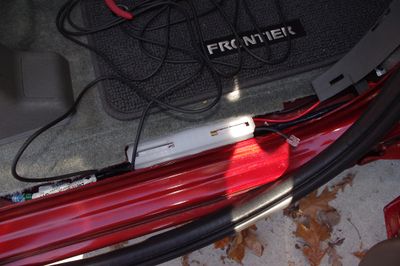
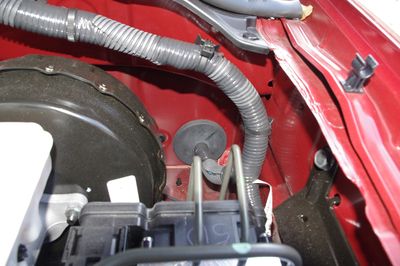
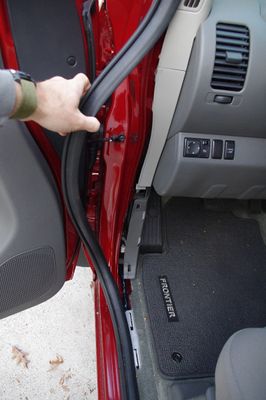
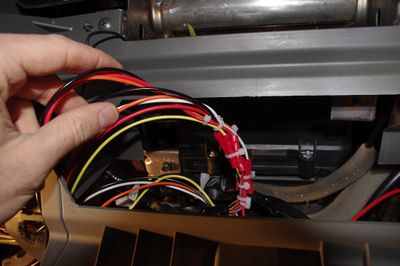
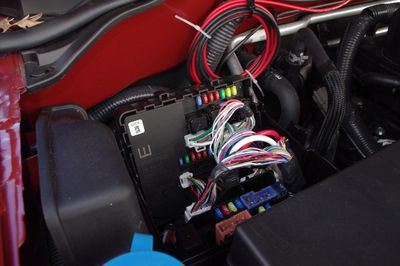
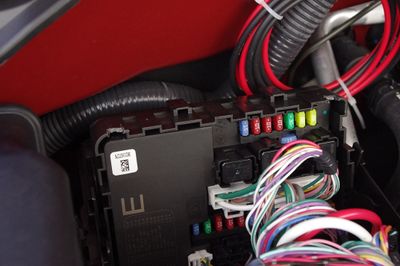
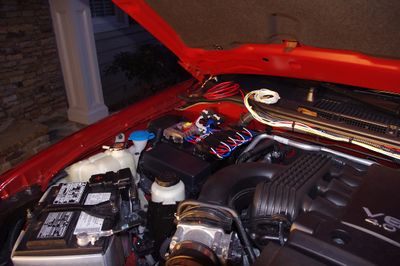
- Now locate the Large Rubber Gasket with a big cable bundle that runs through the Firewall between the Engine Compartment & the Cab. This is located at the Driver's seat all the way toward the outside of the vehicle. The photos below show this from the Engine & from the Cab.
- Using a very sharp object (like a Scribe) punch a hole through the Rubber Gasket. We're going to make an individual hole for every wire we run. This is to ensure that we maintain a good seal between the Engine Compartment & the Cab. No material is being removed from the Gasket so it makes a nice tight seal around each wire. Then work the hole a bit with a large nail or a Phillips head screwdriver.
- Our goal is to run 2 wires for PWR & GND for the radio. If you use nice stiff 12AWG wire you should be able to force the wire through the hole. Send a Red wire through for power, poke another hole, and send a Black wire through for GND. This will be easiest if you go from the Engine to the Cab.
- Run both of the cables behind the Dash, through the Center Stack, and out by the Glove Box.
- Now, cut the fuse holder ends off the Power Cable that came with the Radio, strip everything down and, using Crimp Butt Splices, attach Red to Red & Black to Black.

- Starting from the Passenger side, start working the cable back toward (and out) the Engine Compartment until everything is more less taut. Then zip tie everything in place. My motto is, you can never have too many zip ties!
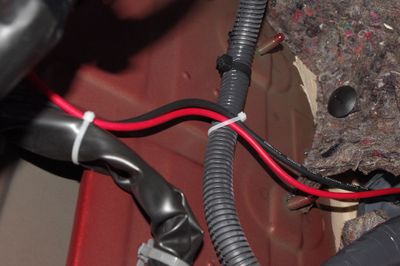
- You now basically done with the Power Cabling inside the Cab. Head out to the Engine compartment, approximate how much cable you need to get over to the Fuse Box area and leave yourself some slack. Zip tie everything in place. I followed the same track as the factory cabling for all my cables. If you plan to go right on into the Switch Cabling you can skip the zip ties for now.


Switch Installation & Cabling
In this section we're going to move the factory Hill Assist & ATC Off switches from the Center Stack to left of the Steering Wheel, move the Cargo Lamp switch from left of the Steering Wheel to the Center Stack, replace the factory Cargo Lamp switch with an aftermarket switch, install 2 more aftermarket switches, and run cabling to make said switches do something!
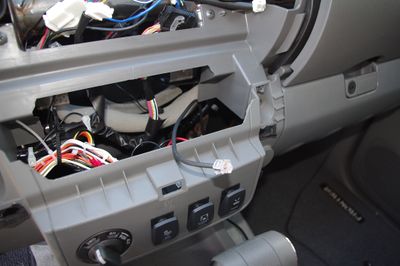
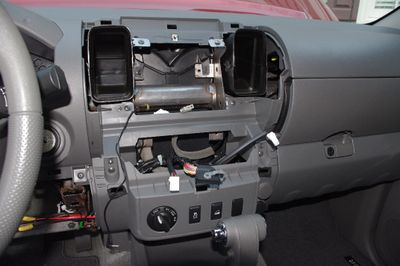
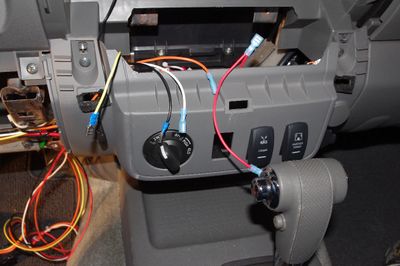
- Alright, Once again, we have to remove the Driver's side kick plate, pull back the gasket, & remove the next panel up. Behind that panel you will find a Phillips Head screw you need to remove. Also remove the Philips head screw to the right of the steering wheel.
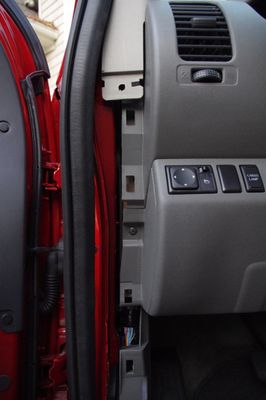
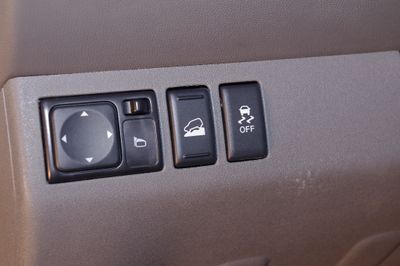
- Now remove the entire plastic section underneath the Steering Wheel and unplug the cable running to the Cargo Lamp Switch. The switch was inserted from the back and so it comes out the same way. Lift up on the little plastic tab on the switch bracket and you'll be able to pull the switch out (through the back).
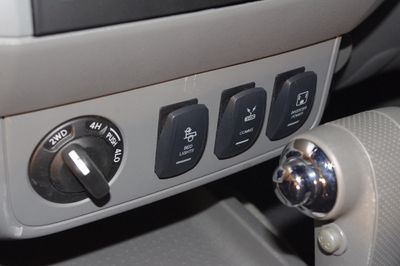
- The switches in the Center Stack come out the same way. Remove the Center Stack. Go in from behind and using a small screwdriver, lift the plastic tabs holding the switches in place. Go ahead and remove the blank switch placeholders from both sides as well.
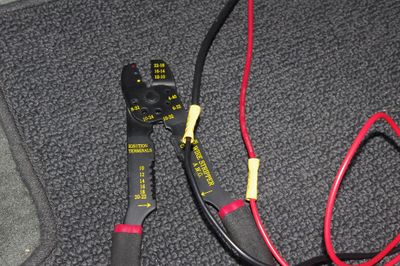
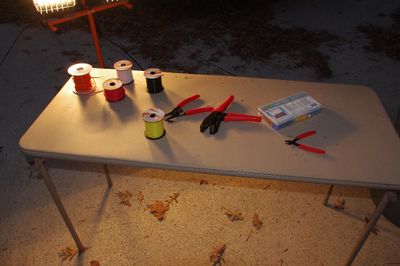
- Now comes the scariest thing you've ever done to your vehicle... it's time to cut some wires! First make sure you have all of the necessary equipment. I recommend several different colors of wire, wire strippers, wire crimpers, and flush cutters. I'm going to show the procedure on the Cargo Lamp switch. You'll need to do the same thing with the other switches.
- You don't have a ton of extra cable so be judicious with yours cuts. Unplug your switches and remove the heatshrink around the cable. The make that oh so scarey cut! Make sure you cut about in the middle of the exposed wires. You'll need to reattach the plug later (unless you opt for an aftermarket switch as I did on the Cargo Lamp switch).
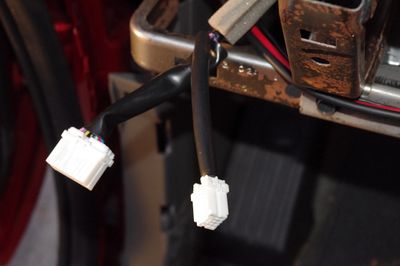
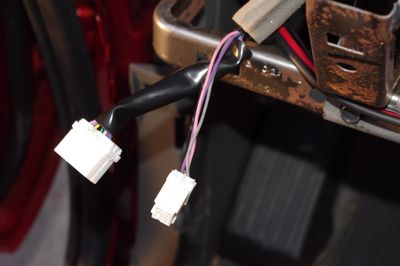
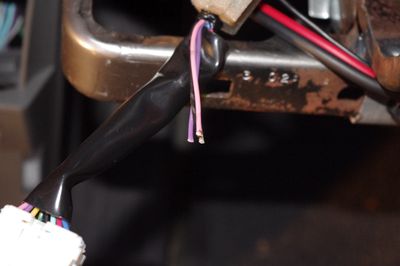
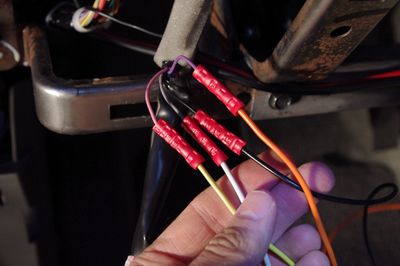
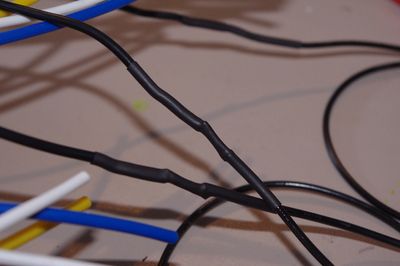
- Now it's time to add some extended length cabling so we can reposition the switch on the other side of the steering wheel. Ideally you'd use the exact same color wire but I didn't have that so I did the best I could. I chose crimp style butt connectors to attach my extensions. It's easier than trying to get a soldering iron in the car. But beware! You must make sure your crimp job is good. Give a tug on every wire you crimp. The 1st time around I had a couple loose connections that cause failures. Once I fixed everything, it worked fine. I've driven about 1000 miles with this new setup (at the time of this writing) with no reliability problems. Once you're confident your crimp job is good, zip tie everything together (1 an inch before, 1 on and 1 an inch after the crimp) to make everything a bit more solid.
- Leave plenty of extra length on your extension lines and cut them to length later. Run them along the bottom of the dash by the steering wheel and out through the opening in the Center Stack. If you are going to use the same factory switch, then re-attach the plug using the same strip, crimp, & zip-tie procedure you used before. Keep your colors straight. If you're going to use an aftermarket switch, keep reading.

- Complete the same procedure for the Hill Assist and ATC Off switches. They will be going from the Center Stack to left of the Steering Wheel. Make sure you leave enough extension cable and makes sure you test all your crimps. Those skinny factory wires can be a bitch.
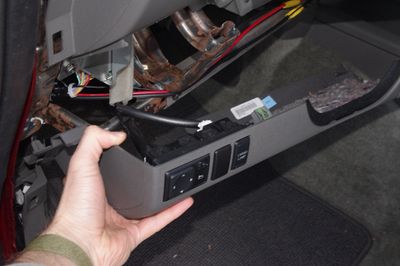
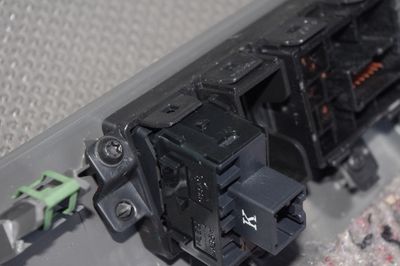
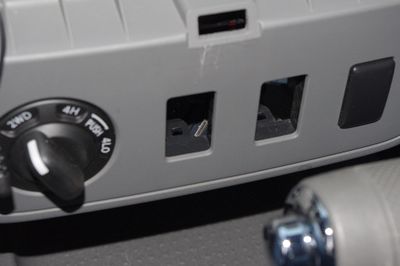
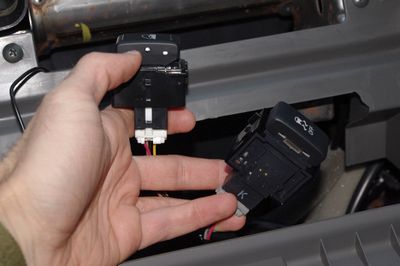
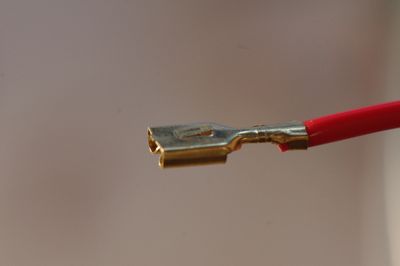
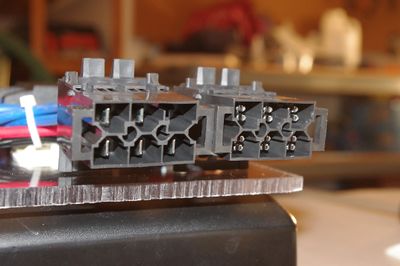
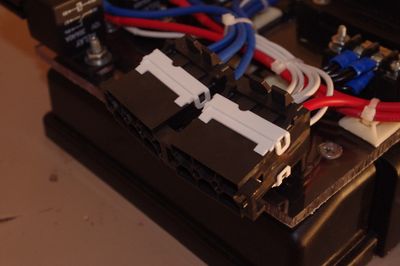
- For your aftermarket switch (like I decided to use) your "plug" will be replaced with crimp style 1/4" female quick disconnects. Crimp one onto the end of each of the 4 cables you ran for the Cargo Lamp switch. The pink & black wires (which became yellow and black for me) are ground and so they can use non-insulated quick disconnects. The grey and purple wires (white and orange for me) are signal and dash light 12V and so they should have insulated quick disconnects applied. The red wire you see is dash light 12V for the other 2 switches. You can pull this from any dash light 12V wire you want. There is 1 each for the Hill Assist & ATC Off switches. To get at it, simply put 2 wires in 1 side of a crimp connector and 1 wire in the other (just like on the red wire in the photo).
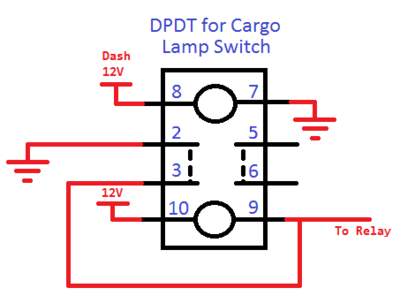
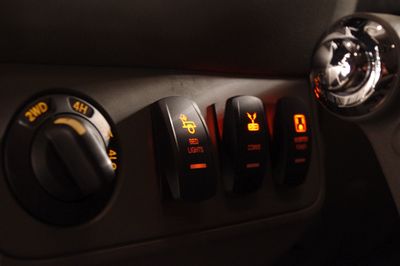
- The aftermarket switches install from the front and stay in place using the little tabs on the top & bottom. Pop your 3 switches into place & follow the wiring diagram below to see how to hook up the switches. There is 1 diagram for the Cargo Lamp Switch and 1 diagram for a more "typical" Accessory Switch. Remember the Cargo Lamp Switch is a DPDT switch with completely independent wiring for the 2 poles and the lamps. The other Accessory Switches are SPDT switches where the lamp circuit is integrated into the switch circuit for simplicity. The special Cargo Lamp Switch is required because the Cargo Lamp relay is activated via a "switched GND." Most "normal" circuits switch VCC instead.


- You're done with the heavy lifting! Test everything before you put the car back together because loose connections (or wrong connections) are easy to make.


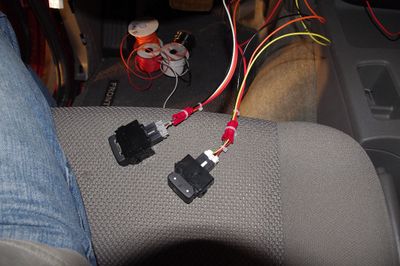
The Power Distribution & Relay Plate
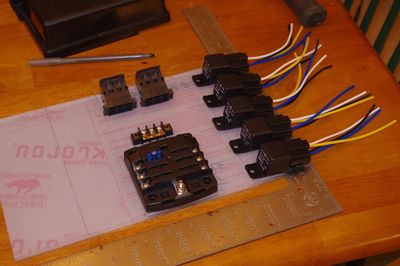
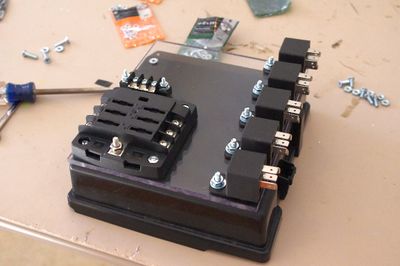
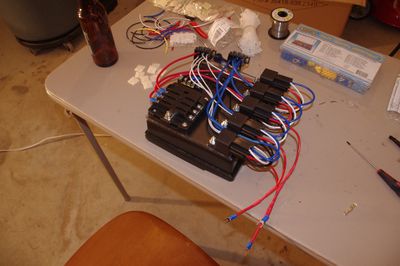
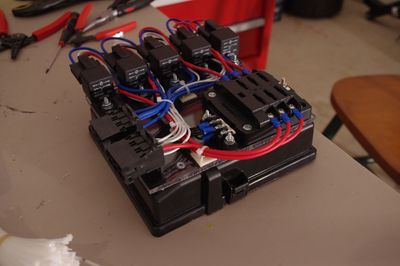
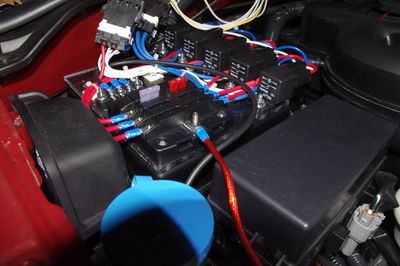
I, obviously, needed to provide power to my new Radio. The Radio comes with a long pigtail that has 2 fuses built into it. The simple thing would be to run those directly to the battery and be done with it... But I don't like to do things the simple way :) I had a couple requirements that drove me to do something a bit more complicated. 1.) I wanted a separate switch to provide power to the FT7900R (and possibly to other radios in the future). This basically requires a relay. 2.) I wanted to make it look nice. 3.) I wanted to make any future accessories I installed faster and easier. In the end I decided to build a Relay/Power Distribution plate that lives in the Engine Compartment. The best location I could find was on top of the bigger fuse/relay box on the passenger side near the firewall. This was a nice flat surface, wouldn't get too hot, and was in close proximity to the battery. The plate has 5 relays on it and 6 fused power paths (1 for switches, 5 to go with the relays). Presently I'm only using 1 out of the 5 channels. For your project, you may want to relocated 2 of the Lid Mount screws. I had to make a little cut to the Fuse Box to get everything to fit. It is detailed below. Ok, here we go.
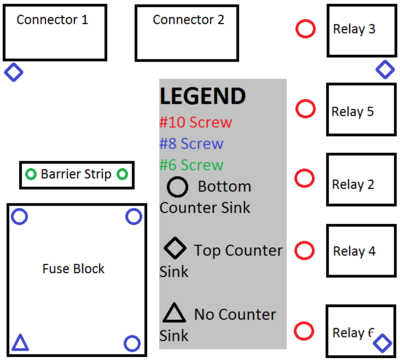
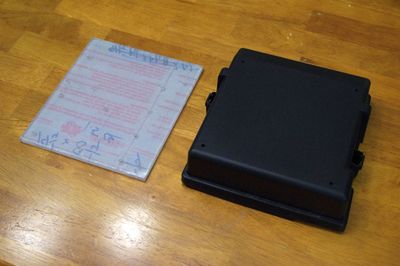
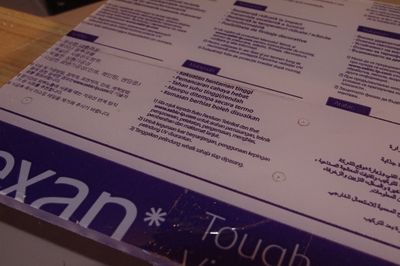
- Get a sheet of Lexan (Mine was 8"x12"x1/4") that you can cut to size to fit on top of the lid for the Nissan Fuse/Relay Box. I found that 6.5"x8" was just about perfect. Mark of a 6.5"x8" rectangle and start laying out your components. As shown in the photo, I placed the fuse block in the lower left, put the relays along the right side, put the connectors at the top left and the negative Barrier Strip just above the fuse block. This gave me a vertical and horizontal channel for all my wires to live. I've included a diagram showing how I laid out my components

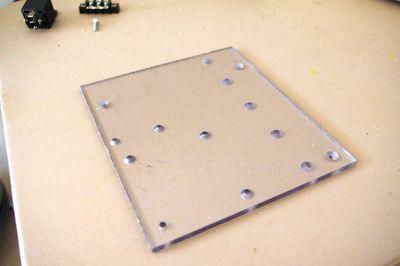
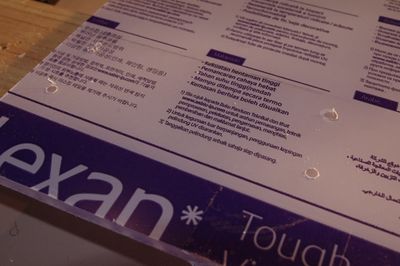
- Now trace around all your components and mark off the mounting holes.

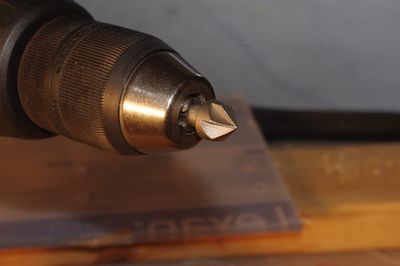
- At this point you need to drill out all the holes to the appropriate sizes. If you used the same parts as me the Fuse Block uses #8 screws, the Relays use #10 screws, and the Terminal Block uses #6 screws. I chose to use #8 screws to mount the plate to the lid of the fuse/relay box. In my design, the Fuse Block and the plate mounting to the lid share a hole. A drill press would be best for this, but a hand drill will work. Check out the drill guide for help making sure you do everything right.
- We now need to countersink all the holes since most of the screws will have components on top of the or need to be flush to not interfere with the top of the Lid. You need to make sure that you countersink the right side of each hole! The Barrier Strip needs to have the bottom of the hole countersunk. The Relays need to have the bottom of the hole countersunk. The Fuse Block needs to have 3 of it's holes (all but the one at the corner) countersunk from the bottom. The 3 mounting holes that mate with the lid that are not shared with the fuse block need to be countersunk from the TOP.
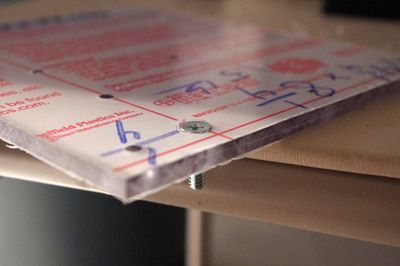
- Now bolt the components to the top of the plate. Notice that the corner hole in the fuse block is left empty and that the bottom relay is tightened down, but twisted out of the way. This is too allow us to mount the entire thing to the lid. Now place the entire plate on the lid and put in the rest of the bolts.
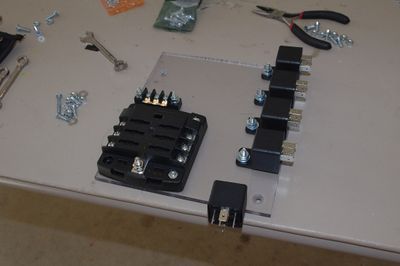
- All Fuse Block holes (except the outer corner) use 8-32x3/4" Flat Head Screws with #6 Lock Washers (should just barely fit on) and 8-32 Nuts.
- The Barrier Strip uses 6-40x3/4" Flat Head Screws with #6 Lock Washers & 6-40 Nuts.
- The Relays use a 10-32x1" Flat Head Screw with a #10 Lock Washer & a 10-32 Nut.
- The 3 Lid mount points that aren't shared with the Fuse Block use 8-32x3/4" Flat Head Screws with #8 Lock Washers & 8-32 Nuts.
- The 1 hole shared by the Lid mount & the Fuse Block uses an 8-32x1.5" Pan Head Screw with a #8 Lock Washer & an 8-32 Nut.
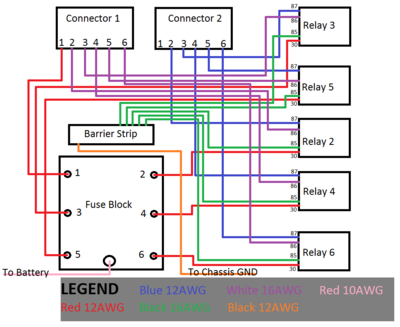
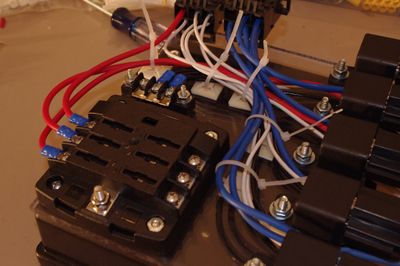
- Below is a cartoon wiring diagram showing how the whole Plate goes together. I connected all black wires (negative side of the Relay Coil) to the Barrier Strip. Make sure you install Jumpers so that all post on the barrier strip are connected to each other. I connected all white wires (Positive side of the Relay Coil) to my 1st connectors. I connected the 5 red wires from the Relays (the common line) to locations 2, 3, 4, 5, & 6 on the Fuse Block. I connected the 5 blue wires from the Relays (the Normally Open line) to the 2nd connector. Additionally a red line in 12AWG was used to provide power to the dash switches which comes off the plate on pin 1 of the Switch Signal Connector.
- Now it's time to add the cabling. I'm not going to detail every single wire I ran but I will show you how I did it and give you a basic rundown. The relays I bought come with sockets and pre-built pigtails. It was necessary that I add length to each wire to accommodate my installation. I added about 2 feet to each wire, knowing i would trim them to length later. Note that I only used 4 wires per Relay because I didn't need anything connected when the Relay was in the "Normally Open" position.
- First strip the ends of the wires you are going to join. Then tin each exposed end. This is done by heating up the wire and applying solder to it. I recommend globing on as much solder as will comfortably go. This will make it easier to join the 2 wires in the next step.
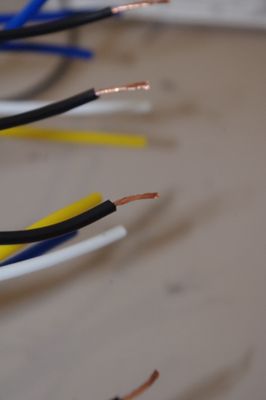
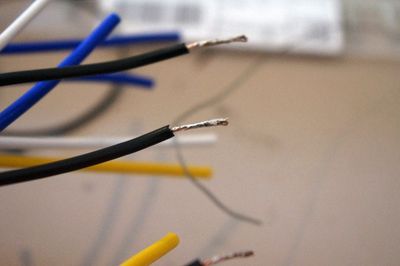
- Next clamp one of the wires in a vice (or vice grips propped up on a screwdriver like I did. Be sure not to make it too tight. You don't want to crush the wire). With your soldering iron in 1 hand and the other wire in the other, join them side by side.
- Now cut a length of heatshrink about 2 inches long, slide it over the junction, & heat it up using a heat gun.
- Repeat this process for every wire on every Relay Pigtail.
- First strip the ends of the wires you are going to join. Then tin each exposed end. This is done by heating up the wire and applying solder to it. I recommend globing on as much solder as will comfortably go. This will make it easier to join the 2 wires in the next step.
- This is a good time to share a tip regarding the cheapo Bosch Relay Sockets. The wires are held into the Socket via a small metal tab. I found that my wires often wanted to fall out. This problem can be remedied by bending the metal tab on the contact on the end of the pigtail wires outward.
- After adding extensions to all the pigtail wires I put everything back together on the plate and layed out each wire, 1 at a time, along the path I wanted it to travel to see how long it needed to be. I went ahead and trimmed them to length and added the appropriate connector on the end. Those wires going to the Fuse Block or Barrier Strip got spade lugs. Those wires going to the Switch Connector got appropriate female connector pins. I'm going to assume you know how to put on spade lugs using a crimp tool. The connector pins are another story. They sell a special tool to put these kind of pins on but I've found a pair of needle nose pliers works just fine. Using the needle nose pliers bend down the fingers on 1 side of the connector & then the other. I also soldered down the wire to the pin for added strength & reliability.
- Once those pins are attached you'll want to install them into the connectors. This is fairly straight forward and all you have to do is push them in from the back. Make sure you push them in far enough that they click into place. Since I chose 2 of the same connector for Switch Control & Power, I decided to make one socket female and one socket male so that I couldn't plug them in backwards. Also, the manufacturer recommends putting on the little white clips to make sure that none of the pins pop out. This was fairly easy for most of the connects but a major pain for 1 and I ended up having to install it with a pair of Channel Lock Pliers.
- Once the wires have been cut to length, pins put on and installed into the connector, and spade lugs put on it is time to start zip tying everything into place. I like the stick on zip-tie anchors to keep everything tidy.
- At this point the Power Distribution Plate is basically complete! Time to install it in the vehicle! Now, unfortunately, I spread my Lid mount screws to all 4 corners of the flat part of the Lid. The back 2 (closest to the firewall) interfere with the top of the Nissan Fuse Holder Assembly. I made a couple small cuts and that fixed it right up. You may consider moving the back 2 screws.
- Moving right along we now need to wire the Plate into the rest of the vehicle. This consists of wiring up the other side of the Switch Control & Power Connectors, wiring GND up to the vehicle, & getting 12V Prime Power from the vehicle. Go ahead and wiring up the Switch Control & Power Connectors just like you did on the Plate following the same instructions as above.
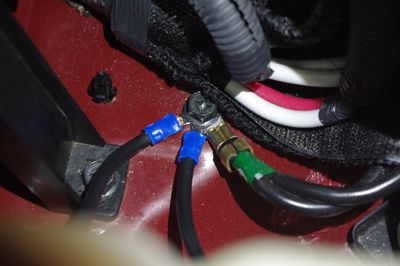
- Next lets take care of GND. Please remember that as you work on these electrical systems you should always disconnect Power from the vehicle. The simplest way to do this is to disconnect the big Black cable from the Negative terminal on the battery. Recall that GND on the Power Plate is all run to a Barrier Strip in the middle of the plate. Thus, we need to run a line from that Barrier Strip to Vehicle GND. I've read a lot of recommendations that GND be run to the chassis as close to the battery as possible (as opposed to the Chassis close to the Device or directly to the battery). This works for me since it is cleaner than trying to get right on the Negative Lug anyhow. I found a bolt on the Chassis right by the battery which is actually the prime point for the battery to GND the vehicle chassis. The extra blue spade lug in the photo below is return for the FT-7900R. The extra green lug is GND from the Battery.
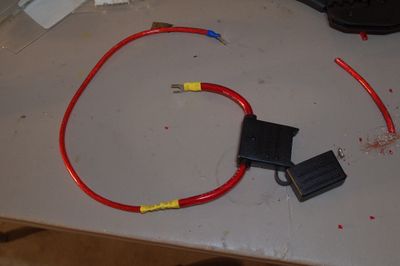
- Finally it's time for Prime Power! We basically need to get power from the positive terminal of the Battery to the Common Post on the Fuse Block. While the Fuse Block provides a nice distribution and fusing solution for the electronics in the vehicle, I still didn't want an unfused line running from the battery to the Power Plate. So I built up an inline fuse cable to solve this. It was necessary to trip some of the insulation around the inline fuse cable because the gauge was too thick to fit in my crimp lug & crimp butt connector. I also had to cut a slot out of the factory Terminal Cover to fit my cable in.


The Radio Body
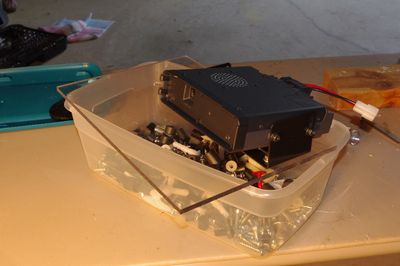
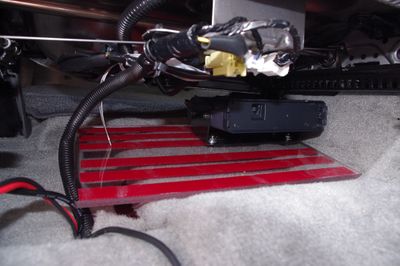
I decided to mount my Radio underneath the Passenger seat. After looking around under there it became clear that there wasn't a good way to mount the included bracket to anything structural. I took an idea from this Under Seat Inverter Install and decided to mount my Radio to a sheet of Lexan and place that underneath the seat. This has worked out well so far. The Radio doesn't move at all. Onto the install!
- I purchased an 8"x12"x1/4" sheet of Lexan off eBay. I had originally planned on cutting it down. It turns out it fits pretty well underneath the seat at its full size. I kept it full size to give more surface area underneath to grip the carpet, and more surface above for future expansion. Therefore, no need to cut this time. Make sure you leave the protective film on both sides of the Lexan while you're working on it. This will ensure the surface stays nice.
- Temporarily install the mounting bracket, that came with your FT7900R to the Radio, to the bottom side of the Radio.
- Place the Lexan Sheet underneath the Passenger seat, set the Radio (with bracket) on top of it, and move it around until it is where you want. Your primary goal here should be to make sure the Radio doesn't interfere with anything underneath the seat (specifically the screws that protrude down near the center) and to push it off to one corner to maximize your future expansion area. Once you have it where you want it. Take a pen/pencil and mark off 2 edges (to form a corner) of the Bracket so you can place it in the same spot on the Lexan later.

- Pull everything out, and remove the Bracket from the Radio.
- Now place the bracket in your marked off spot and mark off the 4 outermost holes from the Bracket
- Once you are satisfied you've put your marks in the right spot, drill out all 4 holes with a #7 Drill Bit. This will be the right size for a "Free Fit" Clearance hole for a #10 screw.
- Now take your Countersink Bit and countersink each hole on the BOTTOM side of the Lexan. Do this a little at a time and insert your 10-32 Flat Head Machine Screw in between each step. This will ensure you don't countersink the hole too far.
- Once you are done you can remove the protective film from the Lexan, install the Bracket, and then install the Radio.
- Now flip the entire thing over and apply strips of Hook Side Velcro Tape. This will help keep the plate in position on the carpet. This is the only thing holding down the plate. It works surprisingly well.
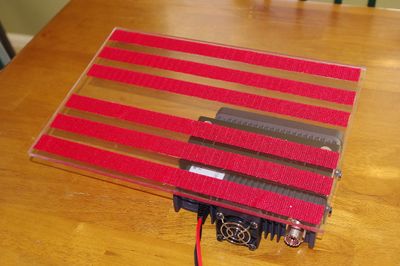
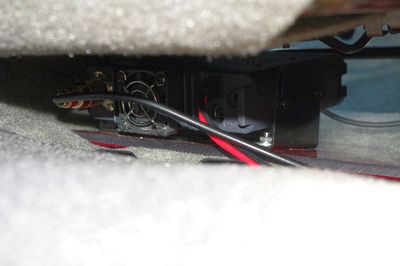
- To install the completed Radio plate you're going to have to partially remove the cross bar the runs underneath the Passenger Seat. This is pretty easy with a 10mm Wrench.
- Now slide the entire Radio Plate underneath the seat and get it situated. Once done you can plug in the Power & Antenna cables! And, of course, put the cross bar back into place.


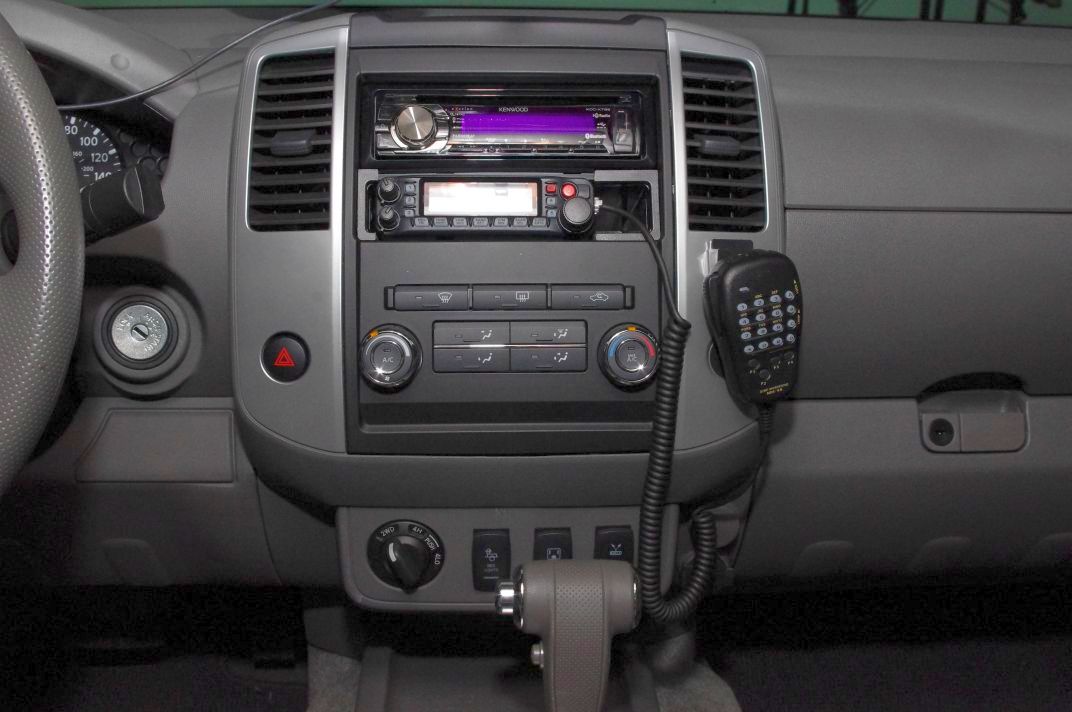
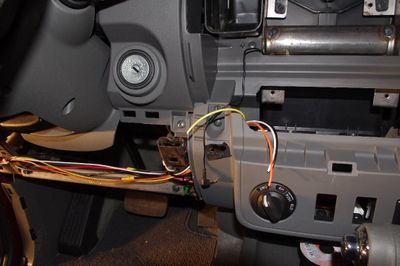
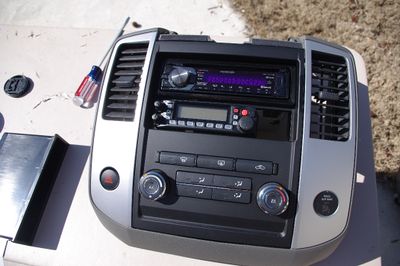
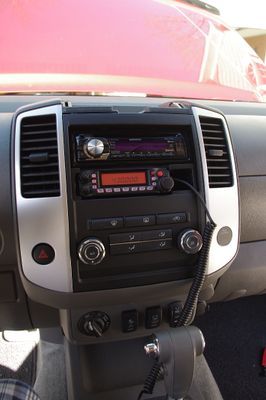
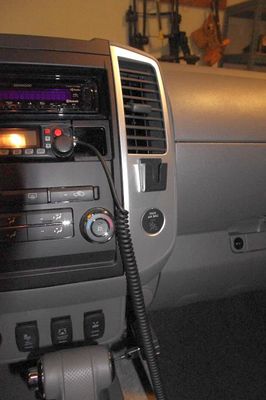
The Radio Face
It took me a while to decide where I wanted to mount the Face of the Radio. I rode around for a month or so with the face sitting in the tray underneath the center stack before I finally decided to undertake installing it into the center stack underneath the Stereo. When I decided to mount the Face underneath the Stereo I noticed that the single DIN gap underneath the Stereo was just about the perfect height to accommodate the Face. I thought that using the existing filler pocket might work although I knew it would take some fairly serious modification. After jumping on Amazon and seeing that I could buy a new Stereo kit with filler pocket for about $12 bucks (in case I ruined this one) I pressed on.
- The first step (and pretty much every other step!) was test fitting. I pulled the Center Stack, removed the filler pocket, and fit the radio into the opening to see if it would work. It was a tight fit, but everything in that area flexes a bit so I pressed on.

- Next I noted how far out the filler pocket sat and about how far out I wanted my radio Face. I put the Face (with mounting bracket) on top of the pocket and drew a rough outline of the material I'd need to remove. Then I pulled out one of my favorite tools (the Dremel!) and got to work.
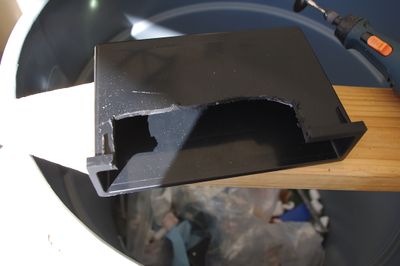
- After a lot of test fit, dremel, test fit, dremel, test fit, dremel I got to a point where the Face Assembly fit in fairly well. Once I was happy with it I cleaned up the edges with a Utility Knife, a couple Files, and some Sandpaper.
- Now that the radio fit about how I wanted it to I marked off & drilled a hole so that I'd still have access to the Ejection Button once everything was assembled. I tested this out a couple times to make sure it worked. Keep in mind that this button is accessible only when the center stack is removed from the dash. You cannot get to this button once everything is put back together.
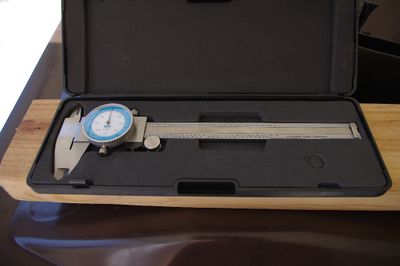
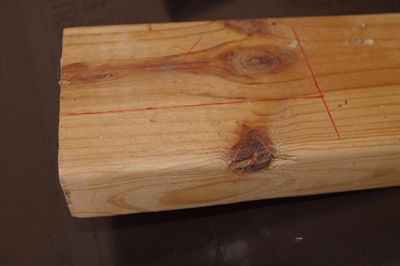
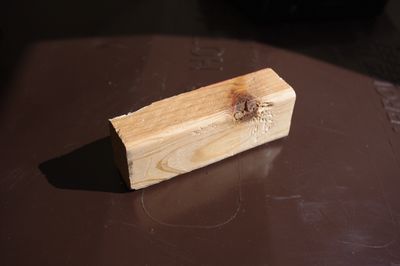
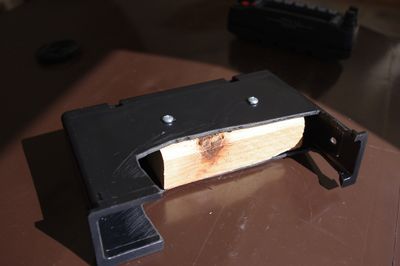
- The next stage involved actually attaching the Face Mounting Bracket to the Filler Pocket. I considered a few, more elegant, options but finally settled on a good old block of wood! After all, this component would be hidden, and any other sort of mounting solution (plastic block, right angle bracket) would mean I'd have to wait to finish the project another time. Using a pair of calipers I measured the inside height of the pocket (Note that the pocket tapers toward the rear). The whole thing flexs a bit so extreme precision isn't necessary. I then eyeballed how wide I'd need it to be (ensuring that the finished product wouldn't block the hole where the data cable connects to the face) and drew it out on a spare 2x4 that was lying around. I cut it out with a Circular Saw & test fit it.
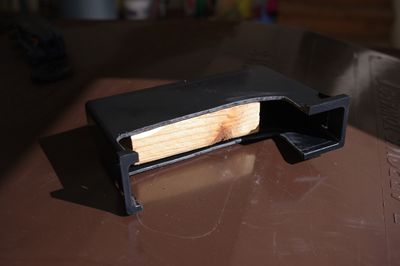
- The next step was to, very carefully, position the block of wood exactly where I wanted it to ensure that the Face was at the right depth and was level. Since the block was a tight fit, it basically stayed where it should. So I slid it in so that it was about 1/4" too far out. I then took the Face Plate Assembly and carefully, slowly, inserted it exactly how I wanted it, pushing the block to its correct position. I then carefully removed the Face Plate Assembly, flipped the Pocket over, and screwed a couple Pan Head Wood Screws in to keep the block in place. Next I screwed the Face Mount Bracket into place and, once again, test fit the entire thing.
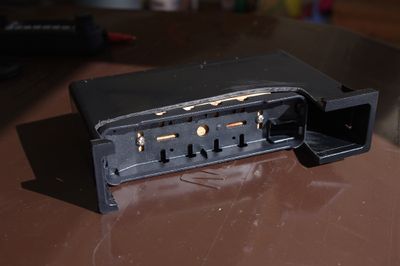
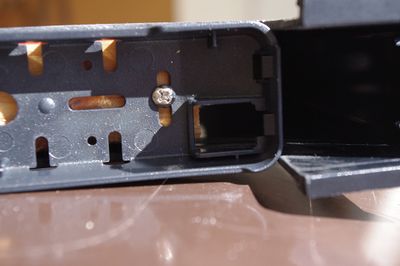
- Using a Stepped Drill Bit I increased the diameter of one of the holes in the back of the Pocket enough so that I could fit the RJ11 connector, on the Interface Cable, through it.
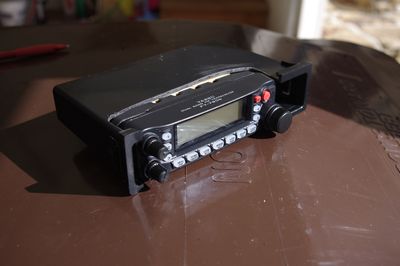
- After putting the Center Stack back together it was time to put the car back together! Looks good!
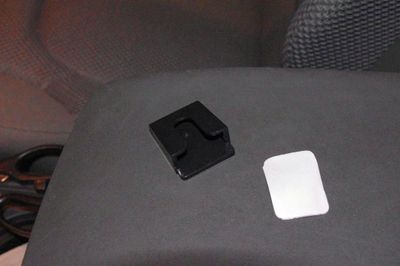
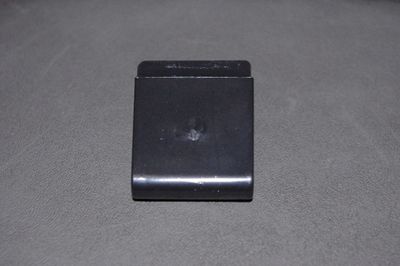
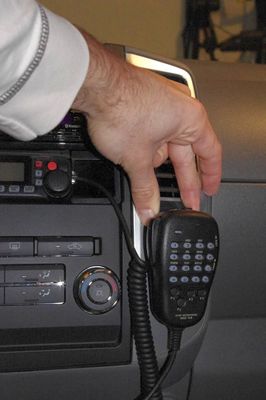
- Now we need find somewhere to hang the mic. I decided the area underneath the right vent was a good spot. I don't really need to see the Passenger Airbag Indicator, it is close to the right side of the radio, it's within reach of the driver and it's got a nice flat space. I found a plastic microphone hanger that attaches with double sided tape. This was ideal since I wasn't excited about drilling holes right in the middle of my console. The back of the hanger wasn't quite flat (it protruded where the plastic was injected) so I cleaned it up with some 220 grit sandpaper. After that it was just a matter of sticking it in place. Notice that I placed the mic in the hanger and temporarily positioned it with my hand to ensure I liked how the mic hung. NOTE: the adhesive just wasn't up to the task of holding the heavy mic on and it fell off a few times. I finally removed it and replaced it with a screw-on style hanger. I didn't take pictures. Eventually I plan on adding a second hanger for a CB Radio. When I do I'll take pictures of that and update the article.
- It's been a long journey but your Yaesu FT-7900R is finally installed and looking great!