Difference between revisions of "How to setup a local QuakeJS server under Windows 10"
(→Setup the UwAmp Web Server, Play Page, & Content Server) |
(→Permanent Install) |
||
| Line 64: | Line 64: | ||
#*You might need to download and install the Visual C++ Redistributable as described at the top of the UwAmp download page. If in doubt, download and install it | #*You might need to download and install the Visual C++ Redistributable as described at the top of the UwAmp download page. If in doubt, download and install it | ||
#Run ''UwAmp.exe'' to install the program | #Run ''UwAmp.exe'' to install the program | ||
| − | #You can test the UwAmp Web Server by running the UwAmp program in the Start Menu. When Windows asks, you'll want to allow the ''Apache HTTP Server'' (and optionally ''mysql.d'' although quakejs doesn't use it) through the firewall on Private & Public networks. Then visit ''http://COMPUTER-NAME'' (or ''http://localhost'' or ''http://127.0.0.1''). You should some something that looks like this | + | #You can test the UwAmp Web Server by running the UwAmp program in the Start Menu. When Windows asks, you'll want to allow the ''Apache HTTP Server'' (and optionally ''mysql.d'' although quakejs doesn't use it) through the firewall on Private & Public networks. Then visit ''http://COMPUTER-NAME'' (or ''http://localhost'' or ''http://127.0.0.1''). You should some something that looks like this<br /> [[File:UwAmp_welcome.png|400px]] |
#Now delete the contents of ''C:\UwAmp\www\'' | #Now delete the contents of ''C:\UwAmp\www\'' | ||
#Copy the contents of ''C:\Users\USERNAME\quakejs\html\'' to ''C:\UwAmp\www\'' | #Copy the contents of ''C:\Users\USERNAME\quakejs\html\'' to ''C:\UwAmp\www\'' | ||
Revision as of 07:15, 10 September 2019
TLDR: This How To will show you how to setup a local QuakeJS server, local Play page (for users to connect to the local server), and a local content server (to provide files to the clients) under Windows 10. It is based off of my original guide using Debian. If you'd like to setup your server under Linux then check out my guide on How to setup a local QuakeJS server under Debian 9 or Debian 10.
I found myself in a situation where I was going to be on a LAN without internet access for an extended period of time along with multiple people and multiple computers. I wanted a fun, fast paced, multiplayer game for us. The catch? I didn't want anyone to have to install anything since these computers didn't belong to us. That's a pretty tall order. What I found was QuakeJS. Quake 3 was open sourced at the beginning of 2012 and some awesome dudes based ioquake3 off of it. Another awesome dude created QuakeJS around 2013/2014. QuakeJS allows you to play Quake 3 entirely in a browser.
The source code has instructions for creating a dedicated server as well as building from source & generating assets for a content server (under Linux). Unfortunately the Emscripten tool used to build the project has changed the way it operates in since 2014 and the current version of the QuakeJS source doesn't build with modern versions of Emscripten. Luckily Inolen provided the precompile .js files for those of us just wanting to run a server. Between those .js files, the QuakeJS README, some helpful discussion on how to setup a local webpage to connect to the server (as well as providing the content necessary to play) and a bit of tinkering, I've been successful in creating a server environment that I'm happy with.
NOTE: This guide assumes your local server's hostname is "quakejs"
Contents
Install Node.js & NPM
- Visit https://nodejs.org and download the latest .msi installer for Node.js (v12.10.0 at the time of this writing)
- Run the .msi to install Node.js & NPM
- Click Next to start the install
- Click Accept & Next to accept the license
- Click Next to accept the default installation folder
- Click Next to accept the default options
- quakejs doesn't require any of the "extra tools" but you can install them if you want by checking the box on this screen. Click Next
- Accept the Windows pop-up and wait for the install to complete
- Click Finish
- You can test this installation by opening a Command Prompt and running
node -v
Install Git
- Visit https://git-scm.com/download/win to automatically start the download of the latest Windows version of the Git client (v2.23.0 at the time of this writing)
- Run the downloaded .exe file to launch the installer
- Click Yes to start install
- Click Next to accept the license agreement
- Click Next to accept the default install location
- Click Next to accept the default options
- Click Next to allow the installer to create Start Menu links
- Select your preferred text editor (I like Notepad++ on Windows)
- Click Next to accept the default PATH option
- Click Next to use OpenSSL
- Click Next to use the default line ending option
- Click Next to use MinTTY
- Click Next to accept the default extra options
- Click Next to skip the experimental features and wait for the install to complete
- Click Finish
- You can test this installation by opening a Command Prompt and running
git --version</pr>
- Run the following command to clone my updated quakejs repo to your Home Directory
git clone --recurse-submodules https://github.com/begleysm/quakejs.git
- Run the following command to switch into the, newly created, quakejs directory
cd quakejs
- Run the following command to install the necessary Node.js modules
npm install
- To download BASE3Q files, run the server for the 1st time by executing the following command. Hold down enter to get through the EULA, agree to the EULA by hitting y and game files will be downloaded. Once all files have been downloaded (you'll see the line ignoring setsockopt command) quit the server by hitting Ctrl+C
node build/ioq3ded.js +set fs_game baseq3 +set dedicated 1
- Optionally run the following command to download additional CPMA files. Again hit Ctrl+C to quit the server once all files have been downloaded (you'll see the line ignoring setsockopt command)
node build/ioq3ded.js +set fs_game cpma +set dedicated 1
- Edit the baseq3 server config file (C:\Users\USERNAME\quakejs\base\baseq3\server.cfg). Pay special attention to seta sv_hostname, seta g_motd, and especially seta rconpassword
- Optionally edit the cpma server config file (C:\Users\USERNAME\quakejs\base\cpma\server.cfg). Pay special attention to seta sv_hostname, seta g_motd, and especially seta rconpassword
- You can test (or run) your server with the following command, but there isn't much point until we setup the Content Server and Play Page.
node build/ioq3ded.js +set fs_game baseq3 set dedicated 1 +exec server.cfg
Setup the UwAmp Web Server, Play Page, & Content Server
If you want to setup a permanent installation you will probably want to install UwAmp as a program on your machine. If you are planning on using it intermittently or just want to test it out, you may want to download the stand-alone ZIP version of UwAmp. Follow either #Permanent Install or #Standalone Install based on your preference.
Permanent Install
- Visit https://www.uwamp.com/en/?page=download and download the exe installer
- You might need to download and install the Visual C++ Redistributable as described at the top of the UwAmp download page. If in doubt, download and install it
- Run UwAmp.exe to install the program
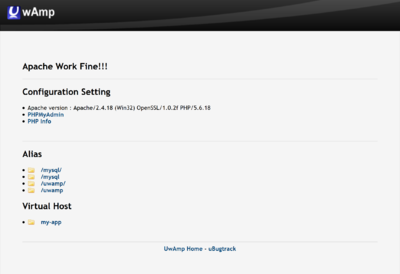
- You can test the UwAmp Web Server by running the UwAmp program in the Start Menu. When Windows asks, you'll want to allow the Apache HTTP Server (and optionally mysql.d although quakejs doesn't use it) through the firewall on Private & Public networks. Then visit http://COMPUTER-NAME (or http://localhost or http://127.0.0.1). You should some something that looks like this
- Now delete the contents of C:\UwAmp\www\
- Copy the contents of C:\Users\USERNAME\quakejs\html\ to C:\UwAmp\www\
- If your computer name isn't quakejs you'll need to change your hostname
- Run the Git Bash program as Administrator by finding Git Bash in the Start Menu, right clicking on it, and selecting Run as administrator
- run the following command to move to the web root directory
cd C:/UwAmp/www/
- run the following command to move to the web root directory
- run the following command to download all of the Content Server files
./get_assets.sh
- run the following command to close Git Bash
exit

Standalone Install
- Visit https://www.uwamp.com/en/?page=download and download the zip installer
- You might need to download and install the Visual C++ Redistributable as described at the top of the UwAmp download page. If in doubt, download and install it
- Extract the contents of the ZIP (UwAmp folder) to C:\Users\USERNAME\
- You can test the UwAmp Web Server by running C:\Users\USERNAME\UwAmp\UwAmp.exe. When Windows asks, you'll want to allow the Apache HTTP Server (and optionally mysql.d although quakejs doesn't use it) through the firewall on Private & Public networks. Then visit http://COMPUTER-NAME (or http://localhost or http://127.0.0.1). You should some something that looks like this
- Now delete the contents of C:\Users\USERNAME\UwAmp\www\
- Copy the contents of C:\Users\USERNAME\quakejs\html\ to C:\Users\USERNAME\UwAmp\www\
- If your computer name isn't quakejs you'll need to change your hostname
- Run the Git Bash program as Administrator by finding Git Bash in the Start Menu, right clicking on it, and selecting Run as administrator
- run the following command to move to the web root directory
cd C:/Users/USERNAME/UwAmp/www/
- run the following command to move to the web root directory
- run the following command to download all of the Content Server files
./get_assets.sh
- run the following command to close Git Bash
exit
Make the QuakeJS Game Server run at Boot
In a permanent install you may want to make the QuakeJS Game Server run when you boot the machine and log in. Follow these steps to create a Schedule Task to run the server any time your user logs in
- Run Task Scheduler from the Start Menu
- click Create Task... on the right
- On the General tab fill in the following information
- Name: QuakeJS Server
- Description: Task to start QuakeJS server in DM mode
- check Run with highest privileges
- Configure For: Windows 10
- On the Triggers tab click New..., fill in the following information, and click OK
- begin the task: At log on
- click Specific user and select your user
- On the Actions tab click New..., fill in the following, and click OK
- Program/script: "C:\Program Files\nodejs\node.exe"
- Add arguments (optional): build/ioq3ded.js +set fs_game baseq3 set dedicated 1 +exec server.cfg
- Start in (optional): C:\Users\USERNAME\quakejs
- On the Conditions' tab optionally uncheck Start the task only if the computer is on AC power
- On the Settings tab uncheck Stop the task if it runs longer than:
- click OK
- On the General tab fill in the following information
Create a Game Server Shortcut
If you are going to run your server intermittently you may want to create a shortcut to launch it. Follow these steps to put a shortcut on your desktop that will launch the game server.
- Right click on the desktop (or in any folder you want the shortcut to live in) and click New and then Shortcut
- In the Type the location of this item: enter
%comspec% /k cd C:\Users\USERNAME\quakejs && node build/ioq3ded.js +set fs_game baseq3 set dedicated 1 +exec server.cfg
- click Next
- enter a name like QuakeJS Game Server
- click Finish
Turning on and off the UwAmp Serve
Simply run C:\Users\USERNAME\UwAmp\UwAmp.exe, or UwAmp program in the Start Menu, to start the server and close it to stop it (you can also start stop with the buttons on the UwAmp GUI once it's running)
Turning on and off the Game Server
Run the shortcut you created on the desktop or go into Task Scheduler and run the QuakeJS Sever task manually to start the server. Close the window that pops up to stop it.
Changing the Hostname
If you want to use a hostname other than "quakejs" you'll need to update the linevar args = ['+set', 'fs_cdn', 'quakejs:80', '+connect', 'quakejs:27960']; //custom args list targeting a local content server and local game server both at the address 'quakejs'in
/var/www/html/index.htmlto your new hostname (instead of quakejs).